
Affiliate Disclosure: Some links mentioned below are affiliate links, we may earn some amount if you make a purchase.
The main aim of an organization is to get high productivity and efficient results. Top organizations used Exchange Server Public Folders as a means to co-ordinates among users. Users can access the Public Folders in Exchange Server to whom the Exchange Administrator has assign permission. A member of Exchange server can be assigned permission to get information and files from Exchange Server. Users can share contacts, notes, calendar items, emails, journals, attachments within Exchange Server Public Folder.
An interesting feature of Public Folders in Exchange Server is mail-enabled. The mail-enabled feature lets Exchange administrators to create public folders and add the SMTP address to it. This functions as a centralized email delivery for organization. The public folders can be shared among employees of same department or managers of the organization to coordinate tasks.
Sharing of files offers various benefits, but it has certain limitations too. As it works centralized public folder, there might be a mistake in file sharing. So, the mail-enabled features in Public folders can be disabled/ enabled as per the requirement. The Exchange Administrator has the authority to make these changes. There are two methods to enable/ disable public folders i.e via Exchange Admin Center and Exchange Management Shell.
Using Exchange Admin Center (EAC)
- Launch the Exchange Admin Center and Sign in with Server credentials
- On the left-pane browse through the options and click on Public Folders
- The list of folders shared among users will appear on the right side
- Select the folder you want to enable/ disable and then the folder details will appear.
- If it is enabled, then click on disabled or if it is disabled then click on enabled
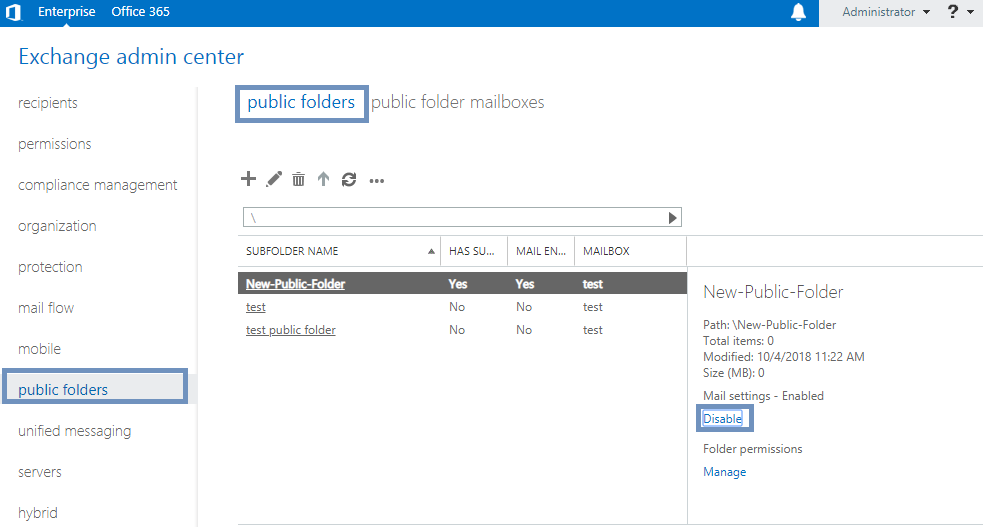
- A message will pop-up for confirmation, click on Yes
- Now, again click on Public folders and select the folder to which you have made changes
- You will see the status under description whether it is enabled/ disabled
Another method to change settings for mail-enabled public folders is via using Exchange Management Shell.
Using Exchange Management Shell for Public Folders in Exchange Server
You should be careful while using the commands in Exchange Management Shell and ensure that no mistake occur. For this, you can cross-check the commands by first typing them in notepad or any other editor.
- Open the Exchange Management Shell and then run the cmdlet
- Disable-MailPublicFolder-identity “New-Public-Folder”. Replace the New-Public-Folder with the name of the folder you want to change.
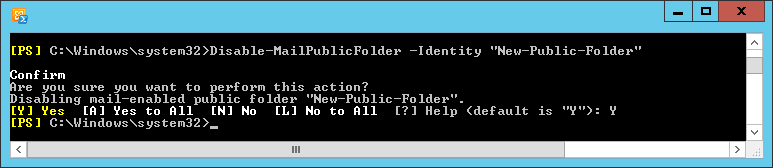
- The command prompt will ask for confirmation, Press ‘Y’ key and hit enter
- To enable the mail Public Folder run the cmdlet Disable-MailPublicFolder-identity “New-Public-Folder”.
- Similarly Press Y and enter to execute command.
By these two methods you can easily enabled/ disabled mail Public folder in Exchange Server
One thing to remember is that making changes to Exchange Server might affect users and if anything goes wrong it may create problems with EDB files. If such happens, you should use the Exchange Server Recovery software. Compatible with all the versions of Exchange Server and easy to use the software fix all the issues whether they are related with exchange files or database. So, if you encounter any error, then instantly move to Exchange Server Recovery.